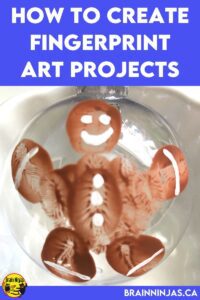
Are you looking for a quick and not-too-messy project for any age? Well, look no further than fingerprint art.
Using a little paint, construction paper and markers, your students can transform their fingerprints into different art projects with lots of engagement and very little time or clean up.
Even though this post focuses on using fingerprint art for Christmas, there are lots of ways you can use this type of art.
Fingerprint Art Projects
Turn the works of art into holiday cards or frame them for gifts. If you have access to globe/ball ornaments, consider doing this activity on the ornaments instead of paper for a great gift to send home with students. We used ours to decorate the walls of our gymnasium for the Christmas concert, but the possibilities are endless.
Make a more permanent version of the cards by painting small tiles, seashells, clear plastic ornaments from craft stores or tree cookies (where you slice a tree into discs).
If you have been avoiding teaching art because of the mess, you need to read this post we wrote about this very problem.
Christmas Ornaments
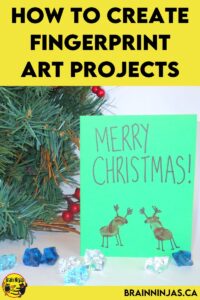
To make the Christmas ornaments, you need the same materials, except you will need something to place the fingerprints on, like a clear, plastic ball. The basic shapes are the same as they are described below.
We used a little bit of black paint to make our details using a toothpick as we thought it would be more permanent. It might be easier for your students to use black Sharpie instead.
Christmas Cards
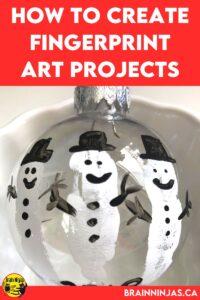
The day before the project, we made paint sponges to save time and mess on the day we were making our cards. With a small piece of sponge that we purchased from a dollar store, we added some liquid paint and let it soak into the sponge. We kept this sponge in a small plastic container with a lid. We made one for white, one for green and one for brown.
Paint sponges last pretty long. In fact, we’ve been using the same sponges for several years. When they got really messy, we just washed everything and let the sponge dry out. When the container was cleaned, we just made the paint sponge again.
We print on cardstock or construction paper. The paper needs to be a little thicker than standard printer paper because it will wrinkle from the paint.
When students use the paint sponges, they use one finger, press it on the sponge and then press their finger to the paper. We keep a tissue nearby to wipe our fingers until we’re done art. Students wash their hands properly in the washroom after the project. Our students take turns with the paint sponges.
We managed to cycle through thirty students in about fifteen minutes, as two or three students can use the same colour at the same time. The paint took only moments to dry, so students could begin drawing with markers almost immediately. Students who were waiting got their papers ready, planned their artwork or drew background details. Many students had time to make several cards at once.
Students had a great time coming up with phrases for their cards or “snowmen stories.” Let your students be creative and collect a list of phrases that students can choose from.
Leave the materials in your makerspace so students can create cards any time of year.
And fingerprint art is not just for Christmas-try Halloween!
We created a monster party using fingerprint art. Students used different colours and then added marker details. You can find the whole lesson in our Halloween Art Projects. It comes with step-by-step instructions and student examples so you can see all the possibilities. Find it in our TpT Store ($USD) or our BN Shop ($CAN).
Make thumb-buddies
If you have a group of older students that visit and work with a group of younger students, have them work together. Pair up students so there is an older buddy with a younger buddy. The older and the younger students can each make a fingerprint side by side. We use paint to do this. If you choose to use ink, be warned that your students will all have ink all over themselves (and maybe in other places, too). Then, each of the buddies can write their name and decorate the print. We left our thumb buddies with our younger buddies. But you could have each pair of students make two so they can keep them.
Make a memory
An easy end-of-the-year activity is to have everyone leave a fingerprint on a piece of paper. Students can sign it or even put a face on it to show their personality. It’s a cute alternative to drawing a picture or writing.
Here are some basic ways to make Christmas characters:
Snowmen
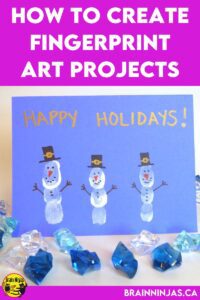
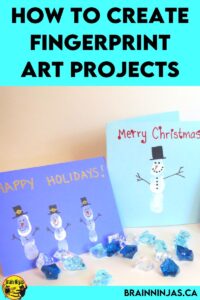
Your little artists can create snowmen easily with white paint. Snowmen can have three prints or smaller snowmen can have two prints stacked on top of each other. It doesn’t matter if the prints are evenly proportioned or completely straight; they’ll still look really cute.
Use the marker to add details such as hats, eyes, buttons, arms or even things they hold, like brooms or toboggans.
Reindeer
Reindeer can be created with two brown prints, a large one for the body and a small one for the head. Place the head on the body by overlapping the prints a tiny bit where the neck would be.
Black or brown markers can be used to add antlers, legs and faces. Don’t forget the hooves! A red marker can be used if students want to make Rudolph.
Trees
Green fingerprints can be stacked on top of each other to create a fan pattern. Once the paint is dried, add decorations to your tree. Students can make one tree or several on a card.
If you dare, get out the glitter. We opted for metallic Sharpies instead. They give a great look without the mess. You can also glue small beads, sequins or buttons to the trees.
Gingerbread People
Print a head, body, arms and legs. Print the body first and then add the other body parts.
Use a marker to add a face and buttons or a bow tie. Our students have made some very creepy-looking gingerbread characters over the years. 🙂
Student Choice
When we had a bit of extra time, some of our students decided to get creative. One made a unicorn with white paint (similar to the reindeer but with different details). Don’t be afraid to let your students come up with their own creations.
Mix Colours and Ideas: Your students can create an entire scene using different colours. Maybe there are some trees, a snowman, and a reindeer. This takes a little time, and students will need to wash their fingers before switching colours.
Looking for more Christmas craft ideas?
Are you looking for more Christmas craft ideas you can use in your classroom? Here are all the posts we’ve already written. Most of these use basic materials that you can find in your house or collect from your students.
- Wooden Christmas Ornaments: Use wooden game pieces to create adorable characters that you can hang on the tree.
- Recycled Paper Ornaments: Use leftover paper from newspapers, fliers or magazines to create folded paper ornaments.
- Recycled Cork Ornaments: Put all those wine corks you have lying around your house to good use and make some new ornaments.
- Christmas Word & Logic Activities: These logic puzzles will keep your students busy during the craziness of the holiday season. They are available on TpT ($USD) and our BN Shop ($CAN).
- Recycled Can Characters: Collect cans with plastic lids (like the ones hot chocolate or coffee comes in) and turn them into holiday characters.
- Recycled Materials: Christmas Wreaths: Create great Christmas gifts by using recycled fabric.
- Simple Christmas Tree Art Projects We Love: Anyone can make these great-looking art projects with very little time or skill.
- If you are looking for books for inspiration, check out our Christmas Books We Love list.
- Save Time With this Christmas Art Collection: A roundup of all of our Christmas art projects.
If you need an art lesson with a bit of structure, we created a set of Christmas Art Projects. Each project comes with a set of lesson plans for the teacher, photos of student examples, reflection pages and suggestions for modifications. You can find the Christmas Art Projects in our TPT Store ($USD) and our BN Shop ($CAN).
Looking for more ways to celebrate the season?
Give it a try! Let us know how it goes! Consider using your works of art to pass out to community members or as gifts for friends and families of your students. We have a post about how to make and hand out community cards.
Are you looking for a lesson you can do that isn’t too Christmas-y? Try our Snow Person Sculpture art project by joining our email list. You’ll also get access to our Resource Library, full of other resources.
Did you try this project? Did your students create something amazing? We’d love to hear from you in the comments below.


