One of our favourite things to do on the first day of school is a simple art project. We’ve collected some art projects for back to school that we’ve used over the years to help us get to know our new students. Self-portraits and names are great ways to get to know the personalities of your new students. Even more, having conversations while students are working is a fantastic way to get kids talking without realizing they are sharing.
Come check out these art projects for back to school (that can work any time of year)
Look At All These Art Projects for Back to School
To be clear, we usually only do one of these art projects each school year for back to school. Since half of our class usually loops with us, we’ve always needed a second project for another year. Some of these are just projects we’ve found along the way and modified for our students.
The best part about all of these projects is that they don’t use any specialized art materials or tools. Basic copy paper and pencil crayons (or markers) are the basic supplies needed for each activity.
We usually start one of these art projects for back to school on the first day and work on it all week. You might be interested in reading 10 Things We Do On the First Day Back to School.
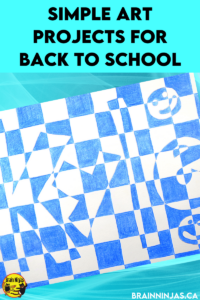
Name Checkerboard
You can grab a complete copy of this lesson in our Resource Library. We can send a copy directly to your inbox when you sign up for our email list.
- Place the paper landscape style. Write your name with very lightly whisper lines in bubble or block letters. Try to fill as much of the page as possible. If there is extra space, you can draw simple icons or drawings. They need to stay simple for the project to work. Once the name is done, darken the lines just enough that they will be visible while working.
- Use your ruler to make vertical lines across your whole artwork. Keep them even by just tracing the width of the ruler each time.
- Use your ruler to make horizontal lines across your whole artwork. Keep them even by just tracing the width of the ruler each time. Now the whole paper is a checkerboard.
- This is where the tricky part starts. We recommend starting the colouring in one corner and working from there. Students who start in the middle usually get mixed up before too long. Once you start coming into contact with the name, alternate between coloured and not coloured spaces.
- We teach students to press firmly with the pencil crayons. It will be all one colour and will use up most of the pencil crayon, so if you have extra or old pencil crayons, these are the ones to use for this project.
- Continue colouring each row, repeating the pattern until the whole page is complete.
Name Stacks
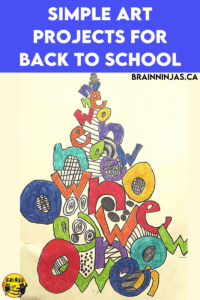
Students use the letters of their names and create a pile of letters using just those letters. Imagine taking a bag of alphabet magnets and dropping them in a pile. That is the look you’re going for.
- Start on the bottom of the pile by drawing each of the letters along the bottom of the page in block letters.
- Using the same letters in any order, start drawing them up the page as if they are in a big pile. They should overlap, be in different directions and they can be slightly different sizes.
- Once the pile is all drawn, students can colour the letters with bright colours that show their personality. Students can use pencil crayons or markers.
- Leave the background blank.
Self Portraits
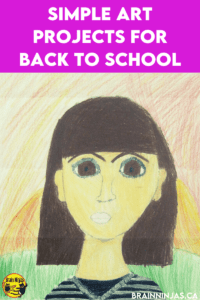
Have students draw a picture of themselves and colour it. We usually help our students with the steps so they can draw properly proportioned faces.
- Fold the page gently top to bottom of portrait orientation. Fold the top half and bottom half in once again to create four sections of the paper. These folds will be the guides for the face.
- At the centrefold, place two eyes. If possible, have students look in mirrors so they can see the shape of their own eyes. Notice whether the iris is completely visible or partially covered by the eyelid. Draw their eyes on the paper.
- At the bottom fold, students will draw their lips.
- Students can draw in the nose from the eyes to just above the lips. Make nostrils first and work your way up. No triangle noses!
- Students can draw the shape of their faces. The top fold should be the top of the head. Eyes are always located in the centre of the face. Remind students that most people do not have a circle-shaped face.
- Students can add ears. The length of the ears should be from the top of the eyes to the bottom of the nose.
- Now that the proportions are correct, students can add a neck, eyebrows and hair that will help the picture look more like them.
- Details such as hairstyle, glasses, earrings, necklaces and shirt collars can also be added and should show the student’s style and be as accurate as possible.
- Students should carefully colour the picture with actual colours such as the correct skin tone, eye and hair colour.
- The more details, the better, but be careful not to clutter the drawing. People should be able to pick the student out of a line-up. Keep the background simple.
Name Patterns
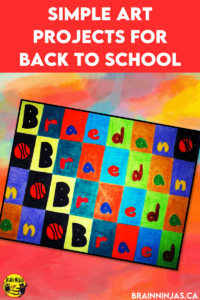
You can grab a complete copy of this lesson in our Resource Library, or we can send a copy to you when you sign up for our email list.
- Start by creating a simple grid by neatly folding the paper lengthwise in half and then in half again so that there are four rows. Unfold the paper and fold the paper in half neatly, widthwise. Fold in again and one more time so that when unfolded, there are eight rectangles across the paper.
- Students will lightly write each letter of their name across the top boxes. On the next row, start on the second space and write each letter all the way across. If the student has 8 letters, write the last letter of the name in the first box. You’re making a rotating pattern using the letters of the name. Start the first letter in the third box on the third row and start the fourth row in the fourth box.
- Once the letters are drawn in lightly, students can make the letters more interesting. Since this is a pattern, each letter in the pattern should look the same each time it’s used. So if they make the first letter a big black letter, then each time that first letter is used, it should match. Encourage students to give the letter character that shows their personality.
- Teach students to press firmly with their coloured pencils to make the colours bright and bold.
- In the spaces where there are not enough letters, draw a simple item that shows personality. Keep it simple enough to repeat the drawing in each row.
- Once all the letters are in and coloured to match the pattern, colour the background of each rectangle so that the entire page is coloured.
Hobby Lines
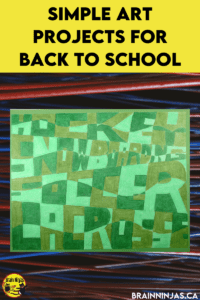
This is a fun one that allows for a little creativity. We use this one to challenge students because it’s a bit of a puzzle as well as an art project for back to school.
- Place the paper in landscape style. Draw three diagonal lines across the page so that four rows are created. They don’t have to be perfectly even, but each word will be drawn into each space so they cannot touch.
- In each row, write a word for a hobby, interest, sport or activity. Each of these words needs to be written into the space so they are block letters and fill the entire space between the diagonal lines. This can be challenging for some students. When the page is done correctly, the whole page is full of the letters for the four words.
- Draw a wavy line across each of the words, dividing the top of the word and the bottom of the word in half.
- Choose three colours. We usually ask students to choose three shades of the same colour because it creates a very neat effect.
- Starting in the top left corner, colour a space with one colour and then colour the adjacent spaces with the other colours. The goal is to avoid having two of the same colours touch as you colour the page. Work your way across the whole page.
Need More Art Ideas?
We have lots of art projects in our store. They are designed for busy generalists who teach their own art classes without any formal art training.
Artists of Canada
These focus on styles and works from different Canadian artists. Find it in our TpT Store ($USD) and BN Shop ($CAN).
Indigenous Artists in Canada
These focus on styles and works from different Canadian artists who identify as First Nations, Métis or Inuit. Find it in our TpT Store ($USD) and BN Shop ($CAN). You can try a lesson from this set in this post.
Light and Shadow Projects
These use elements of light to shadow to create art. It works great to combine this unit with your science lessons. Find it in our TpT Store ($USD) and BN Shop ($CAN).
Plants Inspired Projects
These use elements of plants and flowers to create art. They work great combined with your science lessons. Find it in our TpT Store ($USD) and BN Shop ($USD). Try this poppy lesson for free from our TpT Store ($USD) and BN Shop ($CAN).
Landscape and Geography Projects
These look at how landscapes and geographical features can be turned into art. Find it in our TpT Store ($USD) and Brain Ninjas Shop.
Recycled Materials Art Projects
These use up materials, so they don’t get thrown away. It is found in our TpT Store ($USD) and BN Shop ($CAN). Try this lesson for free when you sign up for our email list or find a copy in our Resource Library.
Winter Themed Art Projects
Since winter in Canada lasts for months, you can do these anytime during the school year. 😉 Find it in our TpT Store ($USD) or BN Shop ($CAN). Try this lesson for free when you sign up for our email list or find a copy in our Resource Library.
Halloween Themed Art Projects
Even though this set is titled Halloween, all of the projects can be adjusted to use any time of year. They can be found in our TpT Store ($USD) and BN Shop ($CAN).
Art All Year
Save your time and money and get all of our art projects in one big bundle. Find it in our TpT Store ($USD) and BN Shop ($CAN).
If you’re avoiding art because of the mess, you might want to read our post Are You Avoiding Teaching Art?
Art Projects That Will Last All Year
Remembrance Day Art Projects
Even More Remembrance Day Art Projects
Mother’s Day Art Ideas
Heart Art Projects You’ll Love
Christmas Themed Art Projects and Crafts
Fingerprint Art
Recycled Wreaths
Recycled Pringle Can Characters
Wooden Ornaments
Paper Ornaments
Handmade Christmas Cards
Recycled Cork Ornaments
Christmas Stocking Creatures
Holi Art Projects are included in our post about Holi the Hindu Festival of Colours.
Do you have a favourite art project for back to school? Share it with us. We’re always looking for more.

