Special occasions are a great time to bring out your favourite art projects, and Remembrance Day is no exception. We teach in a general classroom which means we’re responsible for art lessons all year long. While we like to teach specific skills with different projects, sometimes you have to have art projects around a specific theme for hallway decorating or assemblies.
Remembrance Day is one of those occasions when you don’t have a lot of time for art because you’re just starting to get deep into your lessons, and report cards are just around the corner. That’s why we’ve come up with some simple but stunning projects you can do with your students.
All of these projects could be done with any age, but our results, time measurements and instructions were written with grades four and five in mind.
We’ve started with the longest projects at the top, and then they go to the ones you can finish in the least time. All of them are stunning. If you are looking for even more projects, check out How to Create Memorable Remembrance Day Art Projects.
Ninja Note: We did not include paper sizes. You can reduce the amount of time a project takes simply by using smaller paper.
Watercolour Poppies

This is one of our all-time favourite projects because we love watercolour lessons. You can get your own copy of this lesson by downloading it for free from our TpT Store ($USD) or BN Shop ($CAN). It’s part of our Plants Inspired Art Projects unit found on TpT Store ($USD) and our BN Shop ($CAN).
Materials: watercolour paper (8 ½x11 piece cut lengthwise in half is perfect), watercolour paints or pencils, water cups, watercolour brushes, online access, pencils, rulers, scrap paper, printouts of poppy photographs from online (optional)
- Take a look at some pictures of poppies online. Notice the shapes of the flowers. Have your students practice drawing some on scrap paper.
- Lightly draw some poppies on the watercolour paper.
- Teach students some basic watercolour techniques. For this project, the poppy petals will start with a dark shade along the outside edge and then gradually fade toward the centre of the flower.
- On a piece of scrap paper, have students draw a simple heart shape. If you are using watercolour pencils, shade the pencil firmly along the bumpy part of the heart opposite the point. If you are using watercolour, paint a dark line along the bumpy part of the heart opposite the point. Dip the brush in water and then pull the paint across the heart toward the point without adding more colour.
- Draw poppies on the watercolour paper and paint them. Allow your students to experiment and figure out how watercolour painting works. They should be using water to move the paint.
- Remember to allow adjacent areas to dry before painting next to them, or they will bleed into each other.
Ninja Note: We recommend downloading the free lesson as it comes with MUCH more detail and photographs of each stage.
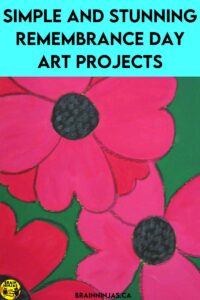
Painted Poppies
This one will take two separate art classes to do. One will be for the painting and drawing, and one will be for the finishing (which needs to happen when it’s dry but doesn’t take long).
Materials: Tempera paint (red, blue, black, white, green, purple), paint brushes, paint palettes (we use ice cream pail lids or plates), water cups, access to water, black pastels (or thick black markers), chalk, construction paper, paper towel
- On construction paper, use chalk to draw three or five poppies. We teach our students to draw different sizes, place them all over the page and have one or two go off the page. When we teach students to draw a circle and then heart shapes as the petals. If they make an error with chalk, it won’t matter because students will paint right over the lines.
- We teach students to paint the colours first (before black) so that the brush doesn’t get contaminated with the dark colours. They should add a little white to the red of the petals to tint the colour making the colour look more alive. Remind students to paint over the chalk lines.
- Teach students how to clean their brushes and then dry them by using a paper towel to gently squeeze the water out.
- Paint the background a cool colour, such as green, purple or blue.
- Clean the brush.
- Paint the center of the poppy black.
- Add shadows under the poppies with a tiny bit of black. If your students are going to destroy their painting because they can’t add shadows yet, just leave this step out.
- Let the painting dry overnight.
- Outline the poppies with black pastel or thick black marker.
Mosaic Poppies
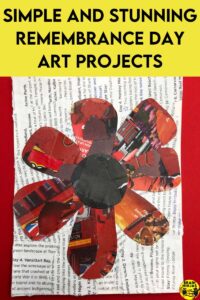
This one is a great one for early finishers to help out with. They look very interesting. Note: If you use Mod Podge, this will take longer (because it has to dry).
Materials: old glossy magazines, both with lots of small print text and with large bright pictures (especially red pictures), glue sticks and white glue, Mod Podge (optional), thick paper (this is the perfect project to use up that sun-damaged construction paper)
- Create the pages. We usually do this on a day early in the week, well before we actually create the art. This is the messy stage, but the kids love it for the most part because they don’t have to be “good” at anything to do these pages to set up.
- Create Page One: Rip up a page of text into walnut-sized pieces and glue the text down randomly all over a piece of paper so that none of the text is completely readable. Cover the entire paper and then set this aside. If needed, trim the pieces that stick out over the edge. If you are going to ModPodge the page, you can lightly brush some over the whole page and let it dry. This page will be the background. Write the student’s name on the back of the page (for later)
- Create Page Two: Rip up red pictures and cover a page the same way as with text, but this page will appear to look red. If you are using Mod Podge, brush it on now.
- Create Page Three: Rip up black pictures and cover a page the same way as before, but this page will appear to look black. Not everyone in the class will need to complete this page because it will be chopped into eight pieces and shared with as many students. We usually only have 4-5 students create this page and then we share it with everyone. If you are using Mod Podge, brush it on before cutting the page apart.
- Create the petals for the flower. Page Two is the petals. The page should be red. If your students need to draw them before cutting, draw on the back of the paper. Aim to cut out 6-8 petals from this one piece of paper.
- Create the centre of the poppy with Page Three. Take one copy of Page Three and cut it into eight pieces and hand that out to students. They will cut a circle from the piece you’ve given them.
- Glue the petals to the centre piece, making a poppy. We have learned that white glue works best to attach the pieces. Place a dab of glue on the edge of the petal and then hold it onto the centre of the poppy. Count to ten or twenty to make sure it’s attached before attaching the next one. Continue until all the petals are attached.
- Use a glue stick like a rolling pin to roll up the edges of the petals so they curl inwards slightly. They are not rolled up, just bent inwards a bit.
- Glue the centre of the poppy down onto the text-covered background. Keep it off-centre or even let it look like it flows off the edge of the page. The only rule we use is that the centre of the poppy must be completely glued down onto the page (but the petals can leave the page).
Checkerboard Poppies
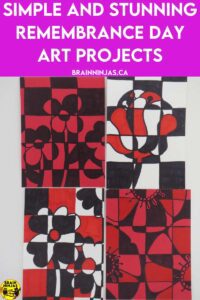
This project makes your students think but requires very little in the way of materials and time.
Materials: Paper (white or red), black markers, red markers, pencils, rulers
- Draw three poppies with pencil. Try to make them different sizes, shapes or have them go off the page. It works a little better if they don’t touch.
- Use a ruler to draw a grid with pencil over the drawing.
- Starting at one corner, colour in a piece of the background or the flower with the black marker. You’ll continue to colour in alternating pieces, trying to make it so no two parts that are side by side are coloured.
- This can be challenging for students, so if they find there is a place where if they colour, it will touch no matter what, leave that not coloured until you’ve finished your page.
- Once all the black parts have been coloured, use the red marker to continue the pattern so that the whole page doesn’t have two of the same colour spaces beside each other.
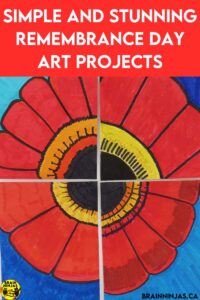
Pastel Poppy Corners
This project is fairly quick and while it can be used with oil pastels, you can substitute markers if you don’t have any nearby. This is a great project to have your little artists collaborate with each other.
You can get a free copy of this lesson in our Resource Library by signing up for our ninja news.
Materials: oil pastels (or markers), paper
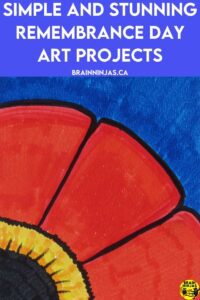
- Students will draw one quarter of a poppy.
- Draw a yellow or orange rainbow shape over one corner on the page.
- Colour the inside of this shape black. This is the centre of the poppy.
- Add the petals reaching outward from the centre of the poppy. Poppy petals are more rectangular away from the centre, but students can use any shape they are comfortable with. Hearts work, too.
- Colour the inside of the petals with reds or pinks (or mixtures of both). If you’re using pastels, blend the colours together.
- Colour the background with a cool colour such as blue, purple or green.
- Go over the entire drawing to make sure the colours are bold and completely cover the paper.
Why Art?
Art should only be one part of your overall learning about Remembrance Day and while poppies are the universal symbol of peace, they make beautiful art any time of year. If you are looking for a project that isn’t a poppy, check out How to Create Memorable Remembrance Day Art Projects.
We love to read books to our students while they work. It keeps the noise level down and our students love to listen to us read. Check out Books for Remembrance Day for some books you can use to deepen your students’ understanding of this important observance.
And if you’re looking for more activities to do regarding Remembrance Day, be sure to check out our post called The Importance of Remembrance Day.
Are you trying to organize an assembly, but you can’t sit together in a gymnasium for a ceremony? Read our post: Easy to Use Remembrance Day Assembly Ideas.
Try a Collaborative Poster
If you’re looking for a simpler art project that only involves colouring, you might prefer our collaborative posters. Each post comes in 18, 24 and 36-piece sets, so they work with classes of different sizes. Students colour their individual pieces and then the poster is reassembled.
We have created one for Remembrance Day, which is available in our TpT Store ($USD) and BN Shop ($CAN). We’ve also made one for Indigenous Veterans Day on November 8, found in our TpT Store ($USD) and BN Shop ($CAN). You can get both posters at a discount in a bundle in our TpT Store ($USD) and BN Shop ($CAN)
We also created a simpler, horizontal poster based on the poem For the Fallen. Find it in our TpT Store ($USD) or our BN Shop ($CAN).
Looking for More Remembrance Day Posts?
- How to Create Memorable Remembrance Day Art Projects
- How to Honour National Indigenous Veterans Day
- Memorable Books for Remembrance Day in Canada
- How to Teach the Importance of Remembrance Day
- Remembrance Day Resources for Canadian Classrooms
- Easy to Use Remembrance Day Assembly Ideas
Did you try any of these projects with your students? What worked? What else have you tried? Leave us a comment below or tag us on Instagram @brainninjastpt because we’d love to see them.


