
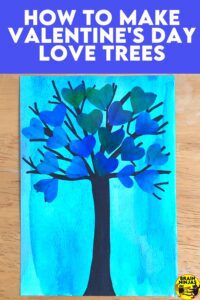
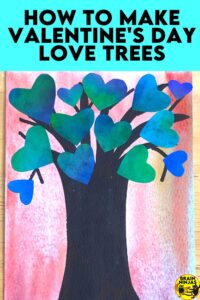
Do you need a Valentine’s Day art project or activity that you can use to teach students about colour while making something special? Do you dread having to find something to do for Valentine’s Day? Are you a Valentine’s Day fool? Or Scrooge? It sounds like you need to learn how to make Valentine’s Day love trees!
There are several variations to make this Valentine’s Day-themed project listed below, but basically, it’s a tree with heart-shaped leaves. Sounds great, right? Who doesn’t need a heart-shaped leaf? So cute and easy to make! They are perfect for World Kindness Day or Pink Shirt Day too!
Materials to Make a Valentine’s Day Love Tree

- paper (if it’s available, use watercolour paper, but any thick white paper will work)
- brightly coloured water-soluble markers (Crayola and Mr. Sketch work best) Sharpies can work as a last resort, but they don’t blend as easily
- watercolour paint
- watercolour paintbrushes
- coffee filters (one per student)
- ice cream pail lids or plastic plates (this will get marker on it, so it should be a surface you can clean and reuse)
- black thick marker (Sharpie works great)
- scissors
- glue sticks or white glue with a glue paintbrush
- spray bottle filled with water
Remember, these materials are just recommendations. Feel free to take the idea and use it with whatever you have available.
Are you avoiding art class because it makes a mess? Well, you definitely should read our post Are You Avoiding Teaching Art? How to Fix That.

Understanding a Little Bit About Colour Terms
To teach your students you might need to have a little bit of information about colours and the colour wheel in order to use the terms properly. You can search online for examples of colour wheels.
Teach your students about the different ways colours can interact. This can be a simple lesson on its own or you can teach it as part of the activity.
primary colours: red, blue and yellow. There are no colours that can be mixed to make these colours.
secondary colours: green, purple and orange. These are colours that can be created by mixing the primary colours.
warm colours: red, orange and yellow. These are the colours we refer to as warm. Think of fire when you use them.
cool colours: blue, green and purple. These are the colours we refer to as cool. Think of water when you use them.
complementary colours: blue/orange, yellow/purple, red/green. These are colours that are opposite each other on the colour wheel.
analogous colours: three colours that are beside each other on the colour wheel
Steps to Creating Valentine’s Day Love Trees
This project works well as a two-day activity. On day one, you can do the painting. On day two, you can do the cutting, gluing, drawing and assembling of the final project. The steps are divided below so you can break the project up if you need to.
- Have students make a watercolour wash on their paper by using plenty of water to make the paint move easily across the page. They should aim for either warm (red, yellow, orange) or cool (blue, purple, green) colours. Leave this to dry while you start to work on the next step.
- Each student colours a coffee filter with water-soluble markers. They can make complementary (opposite) colours or analogous (similar) colours. Broad stripes or patterns look great. They do not have to colour every single piece of the filter, but the majority should be coloured for the best results.
- When students are finished colouring the coffee filters, lay these flat on the plates or lids and spray them gently with water. Less water is better than too much since the water will spread through the filter. This will cause the colours to bleed into each other. Leave these to dry without tipping them or touching them (usually overnight creating a dry filter). When the filter is completely dry, it can be ironed on a low setting if it is too wrinkly. This isn’t usually a problem if the filter is left untouched to dry.
- When the watercolour wash is completely dry (overnight is perfect), use the black marker to draw a tree. Start with a broad trunk and then make it taper off into long branches. Add “y” to the branches to fill out the tree. It’s okay to not be perfect because students can paste the leaves over top of any mistakes.
- When the coffee filter is dry, students can cut out heart shapes. This works well by folding the filter in half and cutting just half a heart. If your students are really struggling with heart shapes, try cutting out a few using some lightweight cardboard (from a cereal box) so they can use it as a tracer.
- Glue the hearts onto the branches of the trees. If you are using a glue stick, be sure to add the glue to the heart, not the tree. If you are using white glue with a paintbrush, be sure not to add too much glue. Just dab it a bit and then attach it to the tree. Arrange the hearts so they cover the majority of the branches, but they do not need to overlap with each other.
- Ask students to explain their colour choices. Are they warm or cool? Are they complementary or analogous? Use this as a method for assessment. Were they able to complete steps independently? Or age appropriately?
Ways to Modify Your Valentine’s Day Love Trees
If you don’t have coffee filters, try just colouring on paper, cut them out into heart shapes and then glue them onto the trees.
If you have students who struggle with working independently, draw one big tree together as a class and place all the hearts on it. It would be a great door decoration.
If you have students who feel like they just can draw a tree, have them just draw the stump and let it go straight up the page. They can glue the hearts on and then make a few sticks poking out of the shapes.
If your hearts are big enough, have students write kind notes on them or happy faces or wishes.
These make great cards which are perfect to send home to parents for any occasion. Make smaller versions of the larger artwork and use the leftover scraps from a larger version as the hearts.
Allow your students to switch hearts so the colours get mixed up a bit. This can be especially effective if the colours create interesting effects.
Experiment with different colours when colouring the coffee filters to see if you can create interesting blends. For example, colour one side yellow and the other blue. Does it make green in the middle?
Do you have other ways to modify these Valentine’s Day lessons? Let us know and we’ll add your details to our post. We’ve made a slightly different version of this project each year and they always turn out beautifully.
Ways to Use Your Love Trees
You can choose to display your Valentine’s Day love trees on a bulletin board or you can turn them into cards and gifts for special people.
Create a Bulletin Board
Pair up artwork with student writing or other art projects depending on the time of year. While we tend to use this project around Valentine’s Day, it also pairs well with Earth Day, World Kindness Day or Pink Shirt Day.
Our Earth Day project is all about loving the Earth. The contrast of the heart trees and planets creates a nice effect (and you can leave up the bulletin board for a few months). We also have a whole post full of Heart Art Projects that work great for Pink Shirt Day, World Kindness Day or Valentine’s Day.
If you’re already on our email list, you can find this project in the Resource Library. Not a ninja yet? You can sign up and we’ll send this project directly to your inbox.

Create Greeting Cards
If you create smaller trees, they can easily be turned into greeting cards for any holiday. We created smaller versions by folding our paper into quarters and making four smaller trees. We cut these apart and attached them to front of folded cardstock. These made a beautiful set of cards that our students sent home for Mother’s Day.
Kick off Your Valentine’s Celebrations
Use this project as a lead into other Valentine’s Day themed activities.
We suggest some Valentine’s Day Logic Puzzles. They are so much fun and they require some reading and thinking skills that will challenge your students. Find them in our TpT Store ($USD) or BN Shop ($CAN). The set can be purchased on its own or as part of a holiday bundle. Find the bundle in our TpT Store ($USD) or BN Shop ($CAN). All of the puzzles come in paper and digital formats.
If you’re looking for a simple colouring activity, try one of our collaborative posters. Our sets include 18, 24 or 36 pieces so they work with any sized group. Students colour a piece individually and all the pieces are assembled to make a poster that fits on a classroom door or bulletin board. Try the We’re So Sweet! Collaborative Poster in our TpT Store ($USD) or our BN Shop ($CAN).
We also have a set of reading, writing and logic puzzles that feature reading mysteries and creative skills. The Valentine’s Puzzles, Word Games and Writing set is found in our TpT Store ($USD) or our BN Shop ($CAN)
For more Valentine’s Day-themed activities, check out our post 9 Easy Valentine’s Day Ideas for Upper Elementary. If you’re looking for more art projects for other holidays or seasons, read Art Projects That Will Last All Year. We also have a post full of Valentine’s Day Books: Our Favourite Books to Use on Valentine’s Day.
What are some of your favourite art projects for Valentine’s Day? We’re always on the lookout for another great project! Be sure to leave us a comment in the space below.