Have you ever seen something in a store and thought, “I can make that for way less money?” Maybe. Or, have you ever thought, “Wouldn’t it just be easier for me to buy it instead of making it?” That’s how we’ve usually felt looking for wooden ornaments for Christmas.
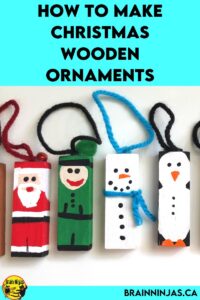
We accidentally made these little Christmas ornaments and they turned out so cute that we knew we had to write about them so others could make their own. This project started completely by accident, but sometimes, the happiest of accidents turn out to be blessings in disguise. So, this is our path to making some wooden ornaments from recycled game pieces, but you can take a few shortcuts with our lesson below.
It started with a bad game
First off, we bought a few imitation sets of the wooden block game Jenga at a local dollar store. We thought we were getting a great deal on the games students could use for math, indoor recess and their spare time.
Then, we realized while playing the game with some students that lots of the blocks were uneven, making the game rather difficult. Pieces would fall out; others would get stuck. One of our more detail-oriented students pulled all the pieces that didn’t match and put them in one set-one crazy set no one ever wanted to use. Life went on.
Fast forward to a shopping trip to a local hardware store where there was an entire aisle of Christmas ornaments. We just happened to pass cute wooden snowmen and thought, “Hey-we can make that!”
Well, it turns out we can make way more than that. We showed students our ideas and they went wild with their own ideas. Pretty much anything you can imagine can become an ornament-and it was SO cheap.
This makes a great gift that students can make in class for their families, or if you want to have all the fun, you can make them for to your students. Basically, a set of 24 wooden blocks cost $2.00 at a local dollar store.
If you have been avoiding teaching art because of the mess, you need to read this post we wrote about this very problem.
Materials You Need to Make the Wooden Christmas Ornaments
- wooden blocks. Any size will do, but smaller works better for ornaments. Look for wooden pieces in Jenga games, or have someone chop a 2.5cm thick piece of wood into ornament-sized pieces for you. Wood scraps also work since the ornaments do not all have to be the same size. Ask your parent community or a local business for donations.
- liquid Tempera paint: basic colours white, black, green, red, brown, and extra colours for details
- paintbrushes-smaller ones will work better for small detailed painting
- toothpicks. These work well to add small details like eyes and buttons on the ornaments.
- yarn/string/thread
- screw eyelets (optional) – these can be attached at the top of the ornament and used to tie a string on so the ornament can hang.
- hot glue and a hot glue gun for gluing heavier objects onto the ornament or attaching the string to the top of the ornament so it can hang.
- little decorations such as pompoms, bells, glitter (or anything else you want to use to decorate) googly eyes. Keep the decorations small so they can be easily attached securely.
This makes a great project in December, so have some fun. This is a great project to put in your makerspace. It’s easy enough to let students create a few. You could even use them on your classroom Christmas tree.
How to Make the Wooden Ornaments
- Paint the blocks. We found the liquid Tempera paint dried very quickly, so we were able to paint one side at a time and let each side dry before moving on to the next one. We allowed some of the wood grain to come through. As each colour dries, it is relatively easy to paint the next colour. Use toothpicks for small details like eyes or buttons.
- Add decorations that you want to use.
- Use a screw eyelet to attach a string for hanging or just glue the yarn/thread/string directly to the top of the block.
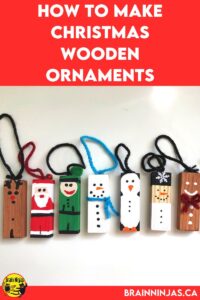
Here are some different designs for you to create.
When you paint, you’ll need to paint one layer at a time, let it dry and then paint the next one. Start with the layer mentioned in each of the descriptions below. When using Tempera paint, it should dry within a few minutes. Before moving on to the next layer, double-check that the paint is fully covering the wood or the layer below it.
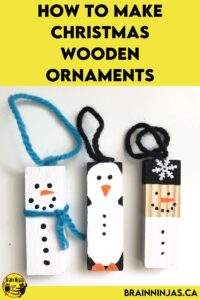
Snowmen
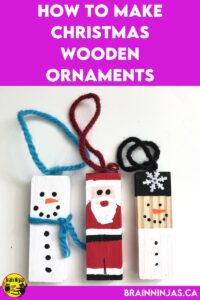
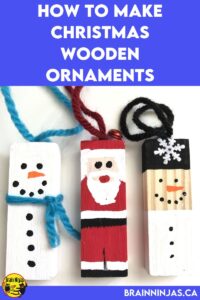
Paint the block white and add details. Alternatively, paint the bottom half white and the top black for a hat. Add a carrot for a nose with a marker, paint or a small piece of orange fabric. You can also add a buckle to the hat.
Santa
Paint the entire block red, then add a black stripe at the bottom for boots and halfway up for a belt. Put a white stripe above the black for the trim of the Santa suit. Paint a round circle for the face. Paint a white beard and trim for the hat. Add black buttons or a silver belt buckle. You could add cotton to the beard or a pompom for the hat.
Elves
Make these just like Santa, but for the face, use a skin colour and add facial details instead of a beard. Paint the body green or other colours instead of red for the outfit. You can use a little black to divide the legs or arms.
Gingerbread People
Paint the block brown and add details.
Penguin
Paint the front of the block white and the rest of the block black. Add face details. Use orange for some feet and a beak. If you are a little better of a painter, create a shape like an eight with the white on the front of the penguin to create the illusion of a head and a body.
Don’t forget the names!
Have your student use an ultra fine-tipped black Sharpie to write their name and the year on the bottom or back of the ornament so it can be treasured for eternity.
Need some other Christmas crafts?
We have created lots of other interesting crafts with our students over the years. We’ve collected them into a series of posts you can check out.
- Save Time With this Christmas Art Collection: A roundup of all of our Christmas art projects.
- Fingerprint Art: Use little fingerprints to make all kinds of wonderful Christmas themed creations.
- Recycled Paper Ornaments: Use leftover paper from newspapers, fliers or magazines to create folded paper ornaments.
- Christmas Word & Logic Activities: These logic puzzles will keep your students busy during the craziness of the holiday season. They are available on TpT ($USD) and our BN Shop ($CAN).
- Recycled Cork Ornaments: Put all those wine corks you have lying around your house to good use and make some new ornaments.
- How to Make Recycled Can Characters: Collect metal or cardboard cans with plastic lids (like the ones hot chocolate or coffee comes in) and turn them into adorable holiday characters.
- Recycled Materials: Christmas Wreaths: Create interesting wreaths by using recycled fabric.
- Simple Christmas Tree Art Projects We Love: These simple to make and create art projects are perfect for the teacher with limited art skills or time.
- If you are looking for a great list of books you can add to your classroom library, you should check out our list of Christmas Books We Love.
If you need an art lesson with a bit of structure, we created a set of Christmas Art Projects. Each project comes with a set of lesson plans for the teacher, photos of student examples, reflection pages and suggestions for modifications. You can find the Christmas Art Projects in our TPT Store ($USD) and our BN Shop ($CAN).
Do you need a simple lesson you can do that isn’t too Christmas-y? Try our Snow Person Sculpture art project by joining our email list. You’ll also get access to our Resource Library, full of other resources.
We’d love to see what your students create, so please tag us on social media! Leave your thoughts and ideas below.