Here’s a little task you can give to your students to make an environmentally friendly Christmas tree ornament. Using recycled paper products is good for the environment, especially if parents keep the ornaments that are created for generations. It’s especially great if you have lots of extra paper lying around. Rescue it from the recycling bin and use it to make the holidays a little brighter.
This is a great task to put into your makerspace for the month of December, but you can make these any time of year if your paper isn’t seasonal.
The Materials You’ll Need to Make Recycled Paper Ornaments
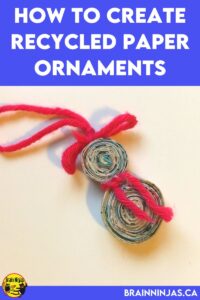
This ornament activity creates an ornament that uses flattened paper rolled up to create shapes just like the one shown in this picture. For this task, we have chosen to make a snowman, but you can make any shape you want – even just a plain old circle.
- newspaper, magazines, used wrapping paper, used greeting cards or flyers. You can also use old maps, books or atlases. Basically, anything made of paper will work, but reuse paper instead of using new paper.
- white glue (glue sticks work, but not as well)
- yarn/string
- ornamental details like googly eyes, bells, felt, ribbon (scraps and leftovers work really well instead of buying new things – ask your parent community to send leftover craft materials and we guarantee you’ll get LOTS).
- markers (optional if you are decorating)
- Tempera paint (optional if you are going to let students paint the ornaments)
- You may need hot glue to attach large pieces together for more durable ornaments that will last longer. For example, the pieces of a snowman might need hot glue to attach each of the circles.
If you have been avoiding teaching art because of the mess, you need to read this post we wrote about this very problem.
Here’s how to make your own recycled paper ornament (a snowman).
- Choose a piece of paper about the size of an 8.5 x 11. It does not have to be exact, but a small piece of paper will make more work, and a long piece of paper is more difficult to manage.
- Fold the paper in a thin row and apply a small amount of glue. Keep folding this paper until you have a thickness of about four folds. Glue the paper shut. Ninja Note: A ruler makes a great tool to flatten out the paper (like a scrapbooking bone).
- Trim the paper lengthwise so you are left with just the folded paper.
- Repeat this process for as many pieces as you will need. To make a snowman, you will need three of these pieces.
- Roll the paper in a spiral fashion for the width you need. To make a snowman, you will need to make three rolls: one small, one medium and one large. Apply white glue along the way so the paper stays in place. Just small dots are enough to keep the pieces together.
- Trim the end when it reaches the desired size. Use an elastic band around the roll to hold it in place until the glue dries. It works best to let this dry for a few hours before decorating it.
- Once you have three pieces rolled and dried, you can attach them to make a snowman by using hot glue to hold each of the circles together to each other.
- Attach a piece of string or yarn to the top so your ornament can hang.
- Attach decorations as needed to make your snowman complete (if that’s what you’re making). You can even paint the paper if you wish.
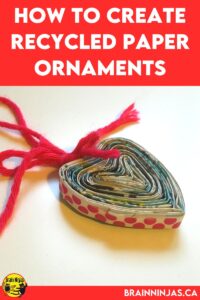
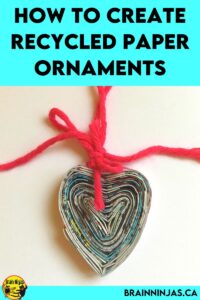
To make a large Christmas ball with this method, simply make one roll much larger and then decorate it. This rolling process can be used to make almost anything. One of our students experimented and made a Christmas Tree by folding the paper back and forth instead of rolling it. Some students also made hearts and snowflakes. You can use clothespins to hold parts of the ornament together while they are drying.
The heart in this picture was created starting with a “V” shape that was clipped and dried before adding the rest of the layers.
How to Make a Christmas Ball Recycled Paper Ornament
We discovered this ornament by accident, but they were so cute that we just had to share!
What you’ll need:
- used greeting cards or cardstock. The paper needs to be a little thicker than newspaper but not as thick as the cardboard you would find on a cereal box.
- a circle that you can trace
- scissors
- white glue
- paperclips
- yarn or string
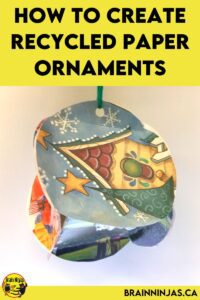
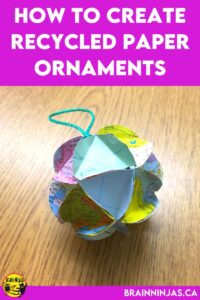
- Trace several circles that are the same size. The large one at the top of the post used six circles, similar to a die. The one on the bottom left used sixteen much smaller circles. Less circles will need bigger circles and smaller circles will need many more. Let your students experiment.
- Cut out the circles.
- Fold the edges of the circles consistently so each circle uses the same shape, such as a square (see the top of this post) or triangle (the one on the lower left) on the inside of the circle. You can even make a cardboard tracer to use on each circle.
- Once you have the folds, start gluing one side of a fold from one circle to another fold on another circle. Keep gluing until every fold is connected to another fold until the whole circle closes. Use paper clips to hold the folds in place while the glue dries.
- Just before closing the last circle, use a piece of string or yarn with a large loop tied to it. Glue the knot of the loop inside the ornament and then glue the last piece shut. This way, the string comes out of the ornament, but it is still secure.
Are you looking for some other Christmas crafts or activities?
We use these ornament projects with the instructions and the materials in our makerspace and let students experiment with them. The truth is, it doesn’t matter how the ornament turns out or how the student creates it. The point is that the student learns something along the way.
- Wooden Christmas Ornaments: Use wooden pieces to create adorable characters that you can hang on the tree.
- Recycled Materials: Christmas Wreaths: Use up all the green fabric you can find to make a cute Christmas wreath from your students to their parents.
- Christmas Word & Logic Activities: These logic puzzles will keep your students busy during the craziness of the holiday season. They are available on TpT ($USD) and our BN Shop ($CAN).
- Recycled Cork Ornaments: Put all those wine corks to good use and make some new ornaments.
- Recycled Can Characters: Collect cans (like Pringle’s cans) and turn them into holiday characters. These make great gifts!
- Fingerprint Art Cards: Create simple yet cute cards that your students can give to friends, family and community members.
- Simple Christmas Tree Art Projects We Love: These easy to make art projects are a great way to use your art class time wisely.
- Are you looking for some Christmas books you can add to your holiday collection? We made a big list of Christmas Books We Love so you can share in the fun.
- Save Time With this Christmas Art Collection: A roundup of all of our Christmas art projects.
If you need an art lesson with a bit of structure, we created a set of Christmas Art Projects. Each project comes with a set of lesson plans for the teacher, photos of student examples, reflection pages and suggestions for modifications. You can find the Christmas Art Projects in our TPT Store ($USD) and our BN Shop ($CAN).
Are you looking for a simple lesson you can do that isn’t too Christmas-y? Try our Snow Person Sculpture art project, which you get for free by joining our email list. You’ll also get access to our Resource Library, full of other resources.
How did your recycled paper ornaments turn out? Be sure to tag us on social media so we can see! What else did you make? Leave your suggestions in the comments below.


