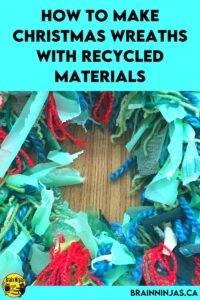
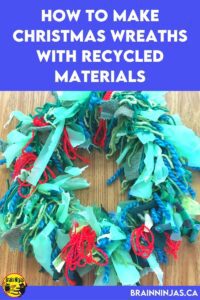
Here is a great activity your students can do that is both environmentally friendly and makes a wonderful Christmas gift. If you plan on using this as a Christmas gift from your students to their families, you’re going to want to start collecting the materials a few months in advance so that you have enough pieces.
Your students can help create one wreath as a group or can create their own wreath, depending on how much material you have to recycle. One wreath takes approximately two average-size shirts. The more material you use per wreath, the better the wreath will look.
This project works for any age that can tie, but older students will be able to do more of the prep work. If you don’t have students who can cut the fabric, ask for some parent volunteers. Set them up in a place where they can sit and chat and drink coffee while they work. If the project is going to be a gift for parents, make sure you don’t tell them exactly what the material is for.
If you have been avoiding teaching art because of the mess, you need to read this post we wrote about this very problem.
Materials you’ll need to make your Christmas wreath
- 1 metal clothes hanger per wreath,
- old green clothes such as shirts, socks, tablecloths, towels, sheets, and pants. They can be a variety of shades of green as well as different types of materials, but in our experience, knitted items do not work well because they unravel.
- scissors that cut cloth (sewing scissors are best)
- green yarn or ribbon scraps
- decorations such as bows, ribbon, bells and old ornaments

Here’s how to make a Christmas wreath
- Bend the metal clothes hanger so that it makes a large circle. Keep the hanger part as it is so that the wreath can be hung when it is finished.
- Cut all the material and yarn into strips about 10-15 cm long and about 2-3 cm wide. They do not need to be perfectly cut or even, so kids can do the cutting if you have enough scissors. We had several students cutting fabric at once. They placed all the strips into big trays until all the fabric was cut up.
- Tie the strips of material and yarn onto the hanger randomly (so that similar colours and materials are not always side by side). It works well to have two people tying on opposite sides at the same time. A single tie is all that is needed. Push the tied pieces up against each other so they start to fill the wreath. Make sure students are tying the pieces on tightly so that nothing unravels.
- Continue tying on pieces until the entire hanger is filled with material. You may need to push the strips together to make more room. Basically, you want students to keep tying until there is absolutely no room left on the hanger. We found that it took two students about an hour of tying to get enough pieces tied onto the wreath.
- Once all the green material is attached to the hanger, trim the ends of uneven pieces so that the wreath is bushy but looks complete.
- Attach your decorations to personalize the wreath. Students can tie ribbons or bows to the wreath as well.
Having trouble getting recycled materials for your Christmas wreaths?
If you are having a hard time getting your hands on lots of green material, try going to a second-hand store and looking for sheets, tablecloths or towels. You can also look for ugly green dresses or shirts. The cost is less than purchasing new fabric and you are still recycling.
In fact, if you talk to the manager of a second-hand store that accepts donations, they might even have some clothing “garbage” that you can pick through for your project. Just throw it through the washing machine once (it doesn’t matter if it shrinks or stretches) and don’t worry about wrinkles.
The metal hangers are a little more difficult to come by. Basically, the only place we know of in our area to find them is dry cleaners, so you might want to reach out to a local business and ask if you can have their bent hangers. Ask your parent community to save and send in their hangers from the beginning of the school year so you’ll have enough. Second-hand stores sometimes have metal hangers as well.

Other ways to use your Christmas wreaths
Hang your Christmas wreaths proudly. This is a great project to leave in your makerspace so students can pick away at it over time. We set up six wreaths and then let students work on them in between their other work or when they finished early. We drew the names of everyone who worked on the wreaths so six students could take them home. A simple bag makes it easy to wrap as a gift.

If you are looking to do this project for other holidays, you can choose different colours and make one for nearly any time or place. We had a student who made one for a baby shower using recycled baby clothes. All the fabric had cute pictures and prints on it – adorable (we wish we had a picture).
Some students decided to make wreaths in different colours just for fun. It’s a great way to use up materials.
Let your students come up with ideas about how to decorate the wreaths. Maybe you have a few students who want to research how to tie big, beautiful bows, and then they teach the rest of the class.
Are you looking for some other holiday crafts?
Check out some of our other Christmas-themed activities.
- Save Time With this Christmas Art Collection: A roundup of all of our Christmas art projects.
- Wooden Christmas Ornaments: Use wooden pieces to create adorable characters that you can hang on the tree.
- Recycled Paper Ornaments: Use leftover paper from newspapers, fliers or magazines to create folded paper ornaments.
- Christmas Word & Logic Activities: These logic puzzles will keep your students busy during the craziness of the holiday season. They are available on TpT ($USD) and our BN Shop ($CAN).
- Recycled Cork Ornaments: Put all those wine corks to good use and make some new ornaments.
- Recycled Can Characters: Collect cans (like Pringle’s cans) and turn them into holiday characters.
- Fingerprint Art Cards: Create simple yet cute cards that your students can give to friends, family and community members.
- Simple Christmas Tree Art Projects We Love: These simple and beautiful art projects are perfect for the teacher with limited time.
- If you are looking for another way to add some festive spirit to your classroom, consider collecting a shelf of holiday books. We made a huge list of titles you can use for inspiration: Christmas Books We Love
If you need an art lesson with a bit of structure, we created a set of Christmas Art Projects with lesson plans for the teacher, photos of student examples, reflection pages and suggestions for modifications. You can find the Christmas Art Projects in our TPT Store ($USD) and our BN Shop ($CAN).
Or try our Snow Person Sculpture art project by joining our email list. You’ll also get access to our Resource Library, full of other resources.
Have you made a lovely recycled wreath? Let us see your completed wreaths. Tag us on social media or leave a link to your project in the comments below.


