If you’re like us (and most teachers), you likely have lots of bits and pieces left over from previous projects. We often have to buy a class set of things and always have one or two left over. The good news is that we have some projects that can use some of that up and still create awesome Christmas tree projects for your art class. Have your students gift them to their families. Come check out these Christmas tree projects.
What Do We Mean By Leftover Bits and Pieces?
Think of all the different projects that you do over the school year. What do you do with that one extra piece of paper, the copies that went wrong, or the rest of that big piece of paper with the little piece cut off? We pile these into a scrap bin to use for projects just like these.
We also collect old Christmas cards, scraps of wrapping paper, ribbon, bows, or anything else that we have leftover or that families donate. These can pile up very quickly, so we try to do these “clean out” projects at least every two or three years.
How We Teach the Christmas Tree Projects
To be clear, we don’t make students all do the same project or even do it the way we show. We demonstrate some different possibilities, and then we let students use their creativity to fill in the rest. Our only rule is that students aren’t wasteful. Even though the pieces are bits and pieces, we still want students to learn to use them responsibly.
We start by modelling each of the Christmas tree projects that are listed below. Show students some of the materials that could work and some of the techniques. We also make a simple anchor chart and attach the sample we’ve made. The anchor charts are posted around the classroom, and all the materials are laid out for students to look at. Students commit to making one of the projects (or propose their own project).
Typically, we use these projects to decorate our school for the Christmas concert season, but we have also turned them into Christmas cards or hanging decorations for our families. Your students may even want to modify them a little if they want to emphasize winter over Christmas (which is easy for many of these).
Each of these projects will require one good piece of paper to attach all the bits onto. We tend to use cardstock or construction paper because the thicker paper holds better.
We include glue sticks and white glue in all the projects. Generally, the glue sticks are used when the wrapping paper or pieces will be laid flat. We use the white glue when rolling up the pieces or attaching pieces that are curly or could come loose. Either way, teach your students how to apply glue and hold it in place while it dries. While these projects are easy, they do take a bit of time and patience.
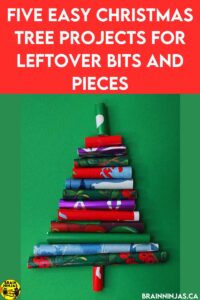
Rolled Christmas Wrapping Paper
This project uses small scraps of wrapping paper. Students could use the same paper for all the rolls or mix them up with different types.
Students will roll up the wrapping paper and glue it shut. We didn’t worry about the length of the roll too much at first, but we did try to make all the rolls have the same thickness.
Once the rolls are dried, trim them so that the lengths range from the longest to the shortest. Just make sure they all fit on your piece of paper. If you’re making a card, you will need to make sure the length of the longest piece fits on the card.
Line up the rolls from longest to shortest so they form a Christmas tree. Attach them to the page with white glue and patiently wait for the pieces to dry completely before moving the page.
Folded In Christmas Trees
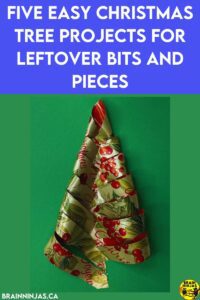
Using a piece of wrapping paper that is a little wider than your piece of paper, cut out a large Christmas tree shape.
Make horizontal cuts from outside edge to the middle of the tree, leaving a one-centimetre space down the middle of the tree. This will make flaps along the sides of the trees.
Glue the middle of the tree down onto the paper in the middle of the page. The flaps will continue flapping for now, and that’s great. Once it’s completely dry, start on the bottom flap on one side. Pull the flap in and paste it along the middle. It shouldn’t stay completely level. Glue it just a little closer to the bottom of the page so the flap becomes a loop. Do the same to the opposite side. You may need to hang on to the middle so the glue dries before continuing.
Continue alternating back and forth until all the flaps are looped up the middle of the tree. Once the whole tree is complete, students can consider adding a star or snowflake at the top of the tree.
Mosaic Trees

This is a very easy one and has two versions. Students can either rip all the pieces, giving it an organic look, or they can cut the pieces into sharp straight lines, giving it a more modern look.
Cut out a Christmas tree shape from thick paper. If you are making a card, make sure it will fit on the piece of paper it will be attached to at the end.
Create mosaic pieces from wrapping paper scraps or Christmas cards (or even some coloured paper pieces).
Attach the pieces over the Christmas tree cut-out so the whole front of the piece is covered in the mosaic pieces.
We’ve tried this with overlapping pieces and leaving a line in between all the pieces (looks great with black paper). It really doesn’t matter how you students do it as long as they make it their own.
Once all the pieces are glued onto the tree, finish the Christmas tree project by attaching it to a piece of paper.
Some of our students added words around the tree when they made their card.
Threading Trees
You will need a thick piece of cardstock for this Christmas tree project. If you’re making a card, fold the page before you start, but unfold it while you sew.
Lightly draw the triangle outline of a tree. Using a thumbtack or pushpin, poke holes evenly along the line. Remind students not to poke themselves while doing this. If you have something softer, like a rug or pillow, it can make it easier. Students who were making larger holes started with thumb tacks and spread out their holes. Once they had holes, they pushed a pencil through the hole to make them a little bigger.
Students can use ribbon, thread, yarn, or string to do this, but have them test the size of their holes before they start threading. We found that coloured thread or thin yarn was the easiest to use. Students who used ribbon had to be very patient not to rip the holes by pulling too tightly. The holes should be big enough that students don’t need to use needles, but if you have large needles, it can be helpful for students with fine motor issues.
Start on one side of the tree by putting the thread from the back of the picture to the front. Tie a very small knot and tape it to the back. Try to leave a little bit of a tail so the thread doesn’t come undone. Move the thread back and forth across the holes. It does not matter if students make lines or crisscross. In fact, encourage your students to make something interesting.
Once finished, tie another knot and tape down the end. Add a little white glue to the ends to keep them secure. Some students even added a piece of paper over the back of the tree to keep the threads in place. If you are using this for a wall hanging instead of a card, duct tape or masking tape on the back is very effective.
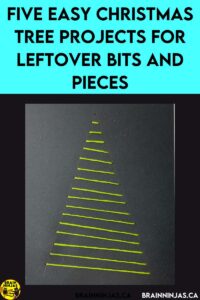
Strips of Paper

This is a great one for using up pieces of wrapping paper or scraps.
Cut strips of paper. Try to keep the widths of the paper the same so they will look somewhat uniform when attached to the page.
Make the strips different lengths. The longest piece will need to be long enough to fit on the piece of paper that you are using to make a card or a wall hanging.
Use a glue stick to attach the papers from longest to shortest. Leave a little bit of space in between each piece until you have a Christmas tree shape.
Add words or decorate the background as desired.
We also had students experiment with different shapes of the strips. One student made wavy lines that fit together like a puzzle. It looked great. If you have scissors that cut in different patterns, they can be a nice addition. Don’t forget that students should explore and try things out.
How Many Christmas Tree Projects is Too Many?
We asked students to make one project each, but once that was done, we allowed students to make as many as they wanted to use everything up. This was great for students with combined families or those who wanted to make a card for someone special.
If you’re looking for some different lessons, we have complete lesson plans, photo examples, reflection pages, and more in our Christmas Art Projects. Find it in our TpT Store ($USD) or BN Shop ($CAN).
If you have leftover bits and a bit of clay, these snowman sculptures are lots of fun. We’ll send this free lesson to you when you sign up for our email list. If you’re already on the list, you can find the lesson in our Resource Library.

Are You Looking for Other Christmas Projects?
We have lots of other crafts and projects that you might like.
- 12 Simple Christmas Tree Projects We Love
- How to Make Christmas Wreaths With Recycled Materials
- How to Make Wooden Christmas Ornaments
- Save Time With this Christmas Art Collection
Have you tried any of our projects? We’d love to see the results or hear about your experience. Leave us a comment.